Introduction
We have broken the instructions into two sections. First, we introduce how to generate your own tests using the test generation tool. Second, we present how one could go about executing the generated tests. The test generation tool does not rely on many dependencies and therefore setting it up is not too complex. However, running the simulator to executing the tests requires many dependencies, including dependencies on the graphics card, network setup, python libraries, Matlab libraries, and the Robotic Operating System libraries. Thus the test execution portion of our tool has not been included in the virtual machine. We, however, have still provided instructions on how to setup the test execution on a standalone machine. (Note: We ran our tests on an Ubuntu 16.04 machine with 64 gigs of ram, i9-10900X, and a Titan RTX with 24 gigs of onboard memory).
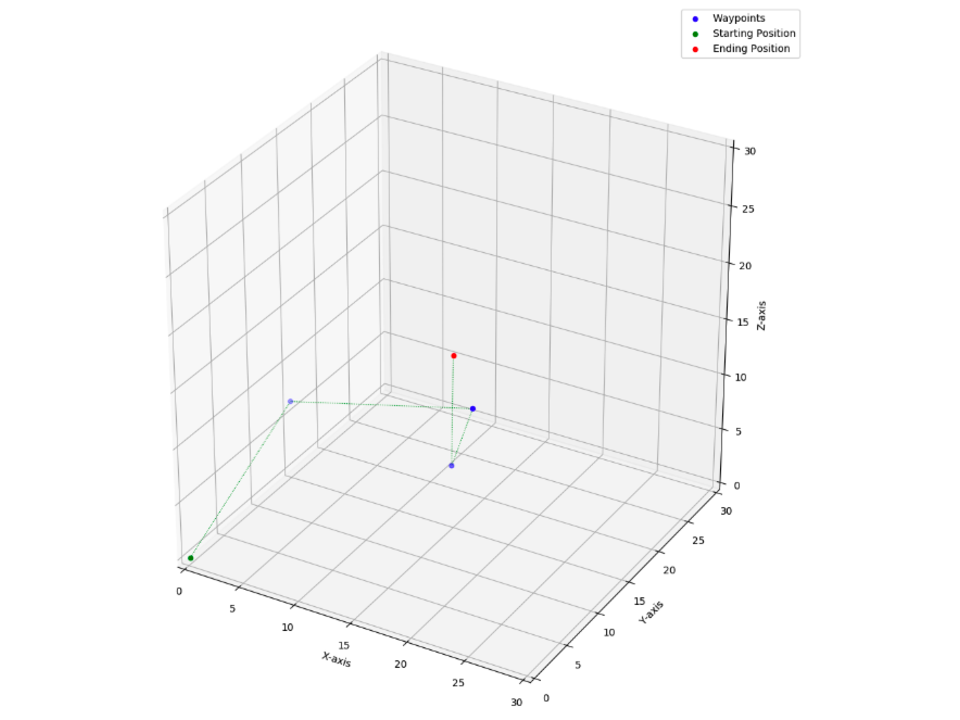
Below we show what the expected results of both the test generation (left) as well as simulator (right) would look like.
Test Generation
This section describes the test generating process used in our study. In our study, we set the total time of test generation to 2 hours. Due to the time constraints for evaluating the tool, we have instead used a total time of 1 minute. We will start by describing how to generate a test suite, followed by how to view the generated test suite. To get started with the generation, go into the ~Artifact\TestGeneration\GenerateTests folder. To do that, you can run the following command in the terminal.
cd ~/Artifact/TestGeneration/GenerateTests
Once you are inside this folder, you can use the python script to generate a test suite. The main.py script will start the test generation process. It takes a set of parameters. Each of the parameters are described in the table below:
| Name | Description |
|---|---|
| drone | The type of drone used, this only is important if the search type is set to maxvel or kinematic. |
| searchtype | The search type used. It can be no search model (random), an approximate kinematic model that uses the maximum velocity (maxvel), or the kinematic and dynamic model (kinematic). |
| score | The scoring model used. It can be no scoring model (random), one of the predefined handcrafted models (edge, edge90, edge180), or a learned scoring model (learned) |
| trajectorylength | The length of the trajectory you wish to create, this includes the start and endpoint. |
| beamwidth | The size of the beamwidth used by the beam search algorithm. |
| nodes | The number of nodes in the world. Each node is a waypoint the drone may use to build its trajectory. |
| resolution | The number of linearly spaced input samples used. All permutations of each input linearly sampled values is used to compute all possible future states the quadrotor might attain. |
| seed | The seed used by the random generator. |
| totaltime | The total time in seconds for test generation and testing the drone. |
| simulationtime | The total time in seconds given to the simulator or outdoor test runs. This time is used by the test generation technique to take into account how much time is required to execute an identified test. |
| savename | A name appended as a prefix to the save file. |
Using the above parameters, we can start the test generation. Let’s create the first test suite using the kinematic model of the MIT drone, with no scoring model and a trajectory length 5. Lets set the total time to 60 seconds and set and estimate that execution in a simulation will take 5 seconds per test. To do that run the following command in the terminal:
cd ~/Artifact/TestGeneration/GenerateTests
python3 main.py --drone mit --searchtype "kinematic" --score "random" --trajectorylength 5 --beamwidth 5 --nodes 250 --resolution 4 --seed 5 --totaltime 60 --simulationtime 10 --savename "artifacttest"
At the end of the test generation process, you will get the following output with the total number of valid trajectories dependant on the computational resources available to the virtual machine.
-----------------------------------
DATA: Total search time: 26.885082483291626
DATA: Estimated simulation time: 50
DATA: Total overall time: 76.88516306877136
DATA: Given time: 60
DATA: Total explored trajectories: 11561
DATA: Total complete trajectories: 5
DATA: Total valid trajectories: 5
-----------------------------------
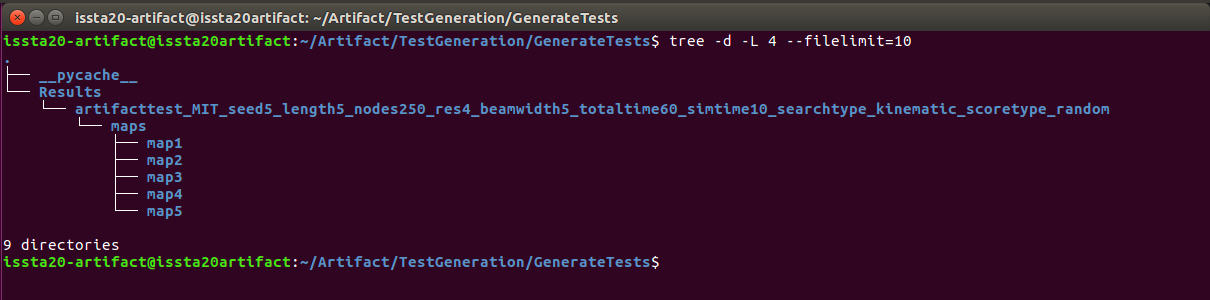
You will notice that the Total overall time is slightly longer than the time given. This is due to the script saving each of the tests which were generated after the 60 seconds ran out. The results will be saved inside the Results folder. To view the results, you can run the following command inside the terminal:
tree -d -L 4 --filelimit=10
You will see that each of the valid trajectories is saved in a corresponding maps folder, as shown below:
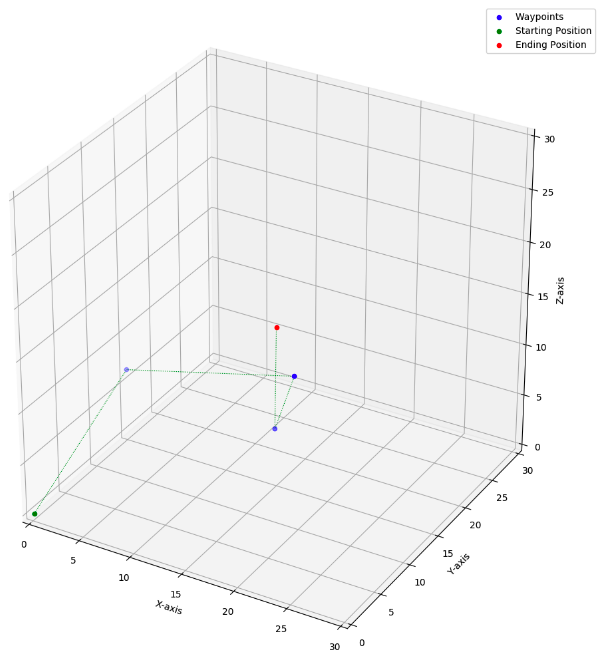
We can then view the individual tests that were generated. Details on how the data is saved can be found in the Raw Data section. Let’s start by viewing the generated test saved inside the details.txt file (You may also wish to view the test.txt folder, which is an abbreviated version of the details folder). To do that run the following command in the terminal:
cat Results/artifacttest_MIT_seed5_length5_nodes250_res4_beamwidth5_totaltime60_simtime10_searchtype_kinematic_scoretype_random/maps/map1/details.txt
Your output will look similar to the output shown below. Notice how we can see the waypoints, velocity, and even angles between the waypoints.
Path: 3
Save Location: maps/map1/test.txt
----------------------------
Path Total Score: 3.0312507552506727
----------------------------
Waypoints: [[0.1, 0.1, 0.1], [4.7921343498865205, 7.647432065058179, 11.678770813814104], ..., [15.0, 15.0, 15.0]]
Velocity: ...
...
Angles: ...
Euler Angles:  [[0.0, 0.0, 0.0], [33.09766054848119, 22.05956114667528, 0.0], ..., [124.40530571552512, 131.4122873273254, 30.062018020436803]]
Finally, we can visualize the test to inspect the trajectory. To do that open the 3D image file using the following command in the terminal:
eog Results/artifacttest_MIT_seed5_length5_nodes250_res4_beamwidth5_totaltime60_simtime10_searchtype_kinematic_scoretype_random/maps/map1/trajectory1.png
You will see the trajectory that matches the description from the details.txt displayed inside a window. For example, our test looked as follows:
We can repeat this experiment for both longer trajectories as well as different search types. For instance, running if we run the same experiment as above except using no search type we would use the command:
python3 main.py --drone mit --searchtype "random" --score "random" --trajectorylength 5 --beamwidth 5 --nodes 250 --resolution 4 --seed 5 --totaltime 60 --simulationtime 10 --savename "artifacttest"
We notice that the output in the terminal is much faster and we get the following results:
-----------------------------------
DATA: Total search time: 60.441088914871216
DATA: Estimated simulation time: 0
DATA: Total overall time: 60.44119954109192
DATA: Given time: 60
DATA: Total explored trajectories: 4898880
DATA: Total complete trajectories: 105
DATA: Total valid trajectories: 0
-----------------------------------
We notice that due to lack of a kinematic and dynamic model, we process many more explored trajectories, however, we find no valid trajectories. We would need to run the experiment much longer before a valid trajectory was found. Now that you are able to generate tests, the next step is installing the simulator.
Installing the Simulator
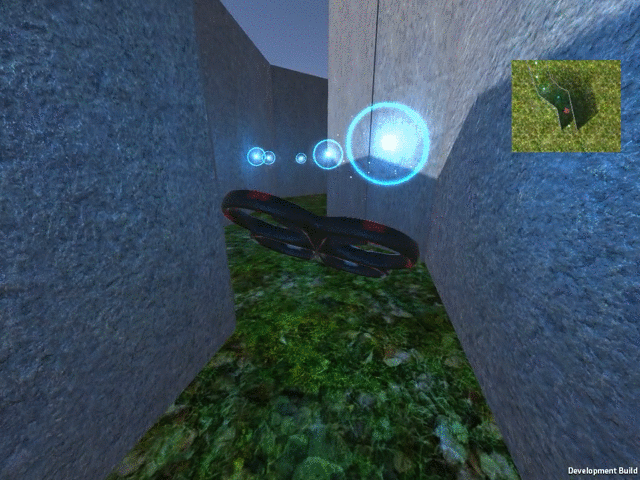
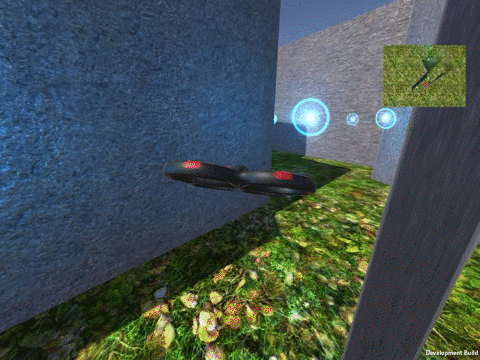
After installing the simulator you will expereince a simulator similar to the one below. (Note: In this example we were flying using the environment settings which can be manually configured.)
NOTE: From this point, the virtual machine will not work. You will need to switch to a powerful machine running Ubuntu 16.04 as the host operating system.
Installing the simulator requires pulling all the data from the git repository. This includes all the Unity files, unity textures, and Anafi simulator code. Following the instructions below to get started. To pull the code you can run the following command:
git clone https://github.com/hildebrandt-carl/RobotTestGeneration.git
Prerequisites
You need to have the following installed in order to run the test generation pipeline:
sudo apt-get install python3-pip python3-tk -y
pip3 install --upgrade pip --user
pip3 install psutil --user
pip3 install numpy --user
pip3 install matplotlib --user
pip3 install scipy --user
pip3 install sympy --user
pip3 install sklearn --user
Generating Initial Tests
We start by generating the tests. The point of this is to generate the initial sets of tests. This includes the tests for all the search strategies namely:
- Random (random)
- Approximate Kinematic (maxvel)
- Full Kinematic (kinematic)
You can generate the tests using the available script. The script which are available alow you to generate either the full set of initial tests, or just a limited number of test sets. The full set of initial tests lets you view how the number fo valid trajectories change per the trajectory complexity. The limited number of test sets allows you to generate just the tests required to run the entire toolchain. The scripts are named as follows:
- initial_all_run.sh
NOTE: These scripts were designed and run on a computer with a 20 core CPU. I recommend changing the number of python scripts launched to be less than or equal to the number of CPU cores you have available.
To run a script you use
cd ~/Desktop/RobotTestGeneration/TestGeneration
./initial_all_run.sh
All tests will be output into RobotTestGeneration/TestGeneration/Results folder. We want to move them to a final folder. Once your tests are done running. You can do this by checking the list of processes. Move the results into the final results folder
mv Results FinalResults
cd FinalResults
mkdir initial_run_flown
mv `ls -A | grep -v initial_run_flown` ./initial_run_flown
Feel free to call initial_run_flown anything you wish. Just remember it for later as this folder name is required.
Fly with WorldEngine
Next lets fly using world Engine. First install the prerequisites
sudo apt-get install python-pip
sudo apt install python-rosinstall python-rosinstall-generator python-wstool build-essential
sudo apt-get install python-catkin-tools
sudo apt install python-wstool
pip install catkin_pkg --user
sudo apt-get install python-scipy
We are going to be running a python Matlab interface and will need to install matlab.engine in python. For that to work we need to have Matlab installed. You then need to install Matlab. Open Matlab and run the following command in the Matlab terminal:
matlabroot
Copy the result of this and then run the following in a normal terminal:
{matlabroot}/extern/engines/python
# Which in my case will be:
/usr/local/MATLAB/R2019b/extern/engines/python
sudo python setup.py install
To start, you need to compile WorldEngine. To do that run the following:
~/Desktop/RobotTestGeneration/WorldEngineSimulation
rosdep install --from-paths src --ignore-src -r -y
catkin build
The next stage is to use the a modified version of FlightGoogles simulator known as the WorldEngineSimulation. To do that we need simply need to run a script inside the WorldEngineSimulation. The script works by assuming you have saved the initial sets of tests as follows RobotTestGeneration/TestGeneration/FinalResults/<your_directory>. You can run the script as follows:
cd ~/Desktop/RobotTestGeneration/WorldEngineSimulation
./run_mit_25001.sh <your_directory> <search_type> <score_type> <save_prefix> <trajectory_length> <search_time> <controller_type>
At this stage you should have a simulator similar setup. After having run the initial set of tests the parameters available are:
- your_directory -> initial_run_flown
- search_type -> random; maxvel; kinematic
- score_type -> random
- save_prefix -> initial
- trajectory_length -> 5; 10
- search_time -> (not required) 3600
- controller_type -> (not required - leave blank for all) -42 -2 -1 2 5 10
The score_type and save_prefix for at this stage of the test generation can only be a single value. They will be used later on. We however want to run the WorldEngineSimulator on all combinations of search_type and trajectory_length. To make this process faster if your computer is able to handle more than 1 simulation I have provided three scripts so that you can run them in parallel. NOTE: you will not be able to run three of the same script at a time as they use static network addresses and will clash. Thus an example of running the simulation in parallel would be:
Remember we need to run it on all combinations so after this run is complete don’t forget to run the trajectories of length 10.
./run_mit_25001.sh "initial_run_flown" "random" "random" "initial" "10" "7200"
./run_mit_25002.sh "initial_run_flown" "maxvel" "random" "initial" "10" "7200"
./run_mit_25003.sh "initial_run_flown" "kinematic" "random" "initial" "10" "7200"
The simulators output will be automatically put into the correct folders inside of RobotTestGeneration/TestGeneration/FinalResults/<your_directory>.
Analyzing Results
The next thing we need to do is to parse all the resulting data to get the details from each of the runs. To do that we use the files which can be found in the TestGeneration/AnalyzeResults folder.
First we want to parse the resulting data to extract high level metrics from it. We do that using the file processResults.py. For each of the test sets we need to extract high level information from them individually. To do that we can run the following commands:
maindir="~/RobotTestGeneration/TestGeneration/FinalResults/<your_directory>"
maindir="/home/autosoftlab/Desktop/RobotTestGeneration/TestGeneration/FinalResults/initial_run_flown/"
python3 processResults.py --main_directory ${maindir} --searchtype "kinematic" --scoretype "random" --fileprefix "initial" --trajectorylength "10" --searchtime "7200"
RQ1
To answer RQ1 you can run the following:
python3 RQ1_GEN.py
python3 RQ1_METRICS.py
RQ2
So for in our case we need to run:
cd ~/Desktop/RobotTestGeneration/TestGeneration
./handcraft_lim_run.sh
This will create a set of handcrafted tests.
Move the handcrafted tests into the results folder (DONT USE THESE COMMANDS YET) - BASICALLY MOVE EVERYTHING INTO handcrafted_run_flown) To do that you can run:
cd ~/Desktop/RobotTestGeneration/TestGeneration/FinalResults
mv ../Results ./handcrafted_run_flown
Waypoint controller tests
cd ~/Desktop/RobotTestGeneration/WorldEngineSimulation
./run_mit_25001.sh "handcrafted_run_flown" "kinematic" "edge" "handcrafted" "10" "3600" "-1"
./run_mit_25002.sh "handcrafted_run_flown" "kinematic" "edge90" "handcrafted" "10" "3600" "-1"
./run_mit_25003.sh "handcrafted_run_flown" "kinematic" "edge180" "handcrafted" "10" "3600" "-1"
Minimum Snap Controller Tests
cd ~/Desktop/RobotTestGeneration/WorldEngineSimulation
./run_mit_25001.sh "handcrafted_run_flown" "kinematic" "edge" "handcrafted" "10" "3600" "-42"
./run_mit_25002.sh "handcrafted_run_flown" "kinematic" "edge90" "handcrafted" "10" "3600" "-42"
./run_mit_25003.sh "handcrafted_run_flown" "kinematic" "edge180" "handcrafted" "10" "3600" "-42"
Unstable Waypoint Controller
cd ~/Desktop/RobotTestGeneration/WorldEngineSimulation
./run_mit_25001.sh "handcrafted_run_flown" "kinematic" "edge" "handcrafted" "10" "3600" "-2"
./run_mit_25002.sh "handcrafted_run_flown" "kinematic" "edge90" "handcrafted" "10" "3600" "-2"
./run_mit_25003.sh "handcrafted_run_flown" "kinematic" "edge180" "handcrafted" "10" "3600" "-2"
Velocity Controller Controller
cd ~/Desktop/RobotTestGeneration/WorldEngineSimulation
./run_mit_25001.sh "handcrafted_run_flown" "kinematic" "edge" "handcrafted" "10" "3600" "2"
./run_mit_25002.sh "handcrafted_run_flown" "kinematic" "edge90" "handcrafted" "10" "3600" "2"
./run_mit_25003.sh "handcrafted_run_flown" "kinematic" "edge180" "handcrafted" "10" "3600" "2"
Now you need to process them using:
maindir="/home/autosoftlab/Desktop/RobotTestGeneration/TestGeneration/FinalResults/handcrafted_run_flown/"
cd ~/Desktop/RobotTestGeneration/TestGeneration/AnalyzeResults
python3 processResults.py --main_directory ${maindir} --searchtype "kinematic" --scoretype "edge" --fileprefix "handcrafted" --trajectorylength "10" --searchtime "3600"
python3 processResults.py --main_directory ${maindir} --searchtype "kinematic" --scoretype "edge90" --fileprefix "handcrafted" --trajectorylength "10" --searchtime "3600"
python3 processResults.py --main_directory ${maindir} --searchtype "kinematic" --scoretype "edge180" --fileprefix "handcrafted" --trajectorylength "10" --searchtime "3600"
You can use the graph deviation file for this:
Plot the deviation
python3 RQ2.py
RQ3
Need to figure out how to generate a learned value for each controller
based on the inital test runs we are interested in two a folders: initial_MIT_seed10_length10_nodes250_res4_beamwidth5_totaltime3600_simtime90_searchtype_kinematic_scoretype_random
We need to generate a model for each of the types in here. To generate a model we run:
maindir="/home/autosoftlab/Desktop/RobotTestGeneration/TestGeneration/FinalResults/initial_run_flown/"
python3 FindTrends.py --maindirectory ${maindir} --searchtype "kinematic" --scoretype "random" --fileprefix "initial" --trajectorylength "10" --searchtime "7200" --saveprefix "len10"
This will produce a set of models in the models directory named:
- len5_speed-1_minsnap0_poly_features.npy && len5_speed-1_minsnap0_regression_mode.npy
- len5_speed-2_minsnap0_poly_features.npy && len5_speed-2_minsnap0_regression_mode.npy
- len5_speed1_minsnap0_poly_features.npy && len5_speed1_minsnap0_regression_mode.npy
- len5_speed2_minsnap0_poly_features.npy && len5_speed2_minsnap0_regression_mode.npy
- len5_speed5_minsnap0_poly_features.npy && len5_speed5_minsnap0_regression_mode.npy
- len5_speed10_minsnap0_poly_features.npy && len5_speed10_minsnap0_regression_mode.npy
Move the models into a final_models folder by running:
cd /home/autosoftlab/Desktop/RobotTestGeneration/TestGeneration/AnalyzeResults
mv Models ../FinalModels
Then we generate a test for each of the system types to do that run:
./learned_model_run.sh
Now move the new tests into the final test folder using:
cd /home/autosoftlab/Desktop/RobotTestGeneration/TestGeneration/
mv Results FinalResults/learned_run_flown
Now we want to fly each of these tests to do that you can run the following:
cd /home/autosoftlab/Desktop/RobotTestGeneration/WorldEngineSimulation
./run_mit_25001.sh "learned_run_flown" "kinematic" "learned" "learned_speed10_minsnap0" "10" "3600" "10"
./run_mit_25002.sh "learned_run_flown" "kinematic" "learned" "learned_speed2_minsnap0" "10" "3600" "2"
./run_mit_25003.sh "learned_run_flown" "kinematic" "learned" "learned_speed-2_minsnap0" "10" "3600" "-2"

./run_mit_25001.sh "learned_run_flown" "kinematic" "learned" "learned_speed-1_minsnap1" "10" "3600" "-42"
./run_mit_25002.sh "learned_run_flown" "kinematic" "learned" "learned_speed-1_minsnap0" "10" "3600" "-1"
./run_mit_25003.sh "learned_run_flown" "kinematic" "learned" "learned_speed5_minsnap0" "10" "3600" "5"
Now that you have generated all the execution files we need to analyze them to get the performance metrics
maindir="/Users/carlhildebrandt/Dropbox/UVA/Research/Work/RobotTestGeneration/TestGeneration/FinalResults/learned_run_flown/"
maindir="/home/autosoftlab/Desktop/RobotTestGeneration/TestGeneration/FinalResults/learned_run_flown/"
python3 processResults.py --main_directory ${maindir} --searchtype "kinematic" --scoretype "learned" --fileprefix "learned_speed-1_minsnap0" --trajectorylength "10" --searchtime "3600"
python3 processResults.py --main_directory ${maindir} --searchtype "kinematic" --scoretype "learned" --fileprefix "learned_speed-2_minsnap0" --trajectorylength "10" --searchtime "3600"
python3 processResults.py --main_directory ${maindir} --searchtype "kinematic" --scoretype "learned" --fileprefix "learned_speed2_minsnap0" --trajectorylength "10" --searchtime "3600"
python3 processResults.py --main_directory ${maindir} --searchtype "kinematic" --scoretype "learned" --fileprefix "learned_speed5_minsnap0" --trajectorylength "10" --searchtime "3600"
python3 processResults.py --main_directory ${maindir} --searchtype "kinematic" --scoretype "learned" --fileprefix "learned_speed10_minsnap0" --trajectorylength "10" --searchtime "3600"
python3 processResults.py --main_directory ${maindir} --searchtype "kinematic" --scoretype "learned" --fileprefix "learned_speed-1_minsnap1" --trajectorylength "10" --searchtime "3600"
Plot the deviation
python3 RQ3_MIT.py
Anafi
We have to do things slightly differently to fly the Anafi drone. We first have to move the data we want to fly with into the AnafiSimulation/TestingAnafi/Outdoor folder. To do that we can run the following commands:
# Clean out the current Anafi simulation folder
cd /home/autosoftlab/Desktop/RobotTestGeneration/AnafiSimulation/TestingAnafi/Outdoor/test
rm -rf maps
# Copy the new data into the Anafi simulation folder
cd /home/autosoftlab/Desktop/RobotTestGeneration/TestGeneration/FinalResults/initial_run_flown/initial_ANAFI_seed10_length10_nodes250_res4_beamwidth5_totaltime7200_simtime90_searchtype_kinematic_scoretype_random
cp -r maps ../../../../AnafiSimulation/TestingAnafi/Outdoor/test
Next we need to open two terminals and run the following in each: Terminal 1:
sudo systemctl start firmwared.service
sphinx /opt/parrot-sphinx/usr/share/sphinx/drones/anafi4k.drone::stolen_interface=enp2f0:eth0:192.168.42.1/24 /home/autosoftlab/Desktop/RobotTestGeneration/AnafiSimulation/sphinxfiles/worlds/empty.world
Terminal 2:
cd ~/Desktop/RobotTestGeneration/AnafiSimulation/TestingAnafi/Outdoor
source ~/code/parrot-groundsdk/./products/olympe/linux/env/shell
python3 runtestwithpos.py --test_number 1 --test_type "simulation"
Finally, we wait until the drone comes to a complete stop. Then we kill the code running in Terminal 2. And inside the simulator, we hit ctrl + r. We then repeat this for all tests in the simulator.
Once you are done each of the folders will contain a simulation_output.txt. We can then convert that file into the same format as our MIT drive by running the following code. In a new terminal run:
cd ~/Desktop/RobotTestGeneration/TestGeneration/AnalyzeResults
python3 convertAnafiToStandard.py --test_directory "/home/autosoftlab/Desktop/RobotTestGeneration/AnafiSimulation/TestingAnafi/Outdoor/test/" --test_type "simulation"
Copy the tests into the initial_run_flown folder
Each map will now have a bunch of performance files which we then can process using:
maindir="/home/autosoftlab/Desktop/RobotTestGeneration/TestGeneration/FinalResults/initial_run_flown/"
python3 processResults.py --main_directory ${maindir} --searchtype "kinematic" --scoretype "random" --fileprefix "initial" --trajectorylength "10" --searchtime "7200" --dronetype "ANAFI"
Now we want to generate more test for us to run on. To do that we:
cd ~/Desktop/RobotTestGeneration/TestGeneration/AnalyzeResults
maindir="/home/autosoftlab/Desktop/RobotTestGeneration/TestGeneration/FinalResults/initial_run_flown/"
python3 FindTrends.py --maindirectory ${maindir} --searchtype "kinematic" --scoretype "random" --fileprefix "initial" --trajectorylength "10" --searchtime "7200" --saveprefix "len10" --dronetype "ANAFI"
Now that we have the models move them into the final models folder. Use that generate new tests
cd ~/Desktop/RobotTestGeneration/TestGeneration
./learned_model_run_anafi.sh
Move the learned folder to anafi_learned_run_flown
/home/autosoftlab/Desktop/RobotTestGeneration/TestGeneration/FinalResults
mv ../Results anafi_learned_run_flown
Then we now run those tests: Fly them in the same manner
We then need to convert them to the standard format:
cd ~/Desktop/RobotTestGeneration/TestGeneration/AnalyzeResults
python3 convertAnafiToStandard.py --test_directory "/home/autosoftlab/Desktop/RobotTestGeneration/TestGeneration/FinalResults/anafi_learned_run_flown/learned_anafi_sim_ANAFI_seed10_length10_nodes250_res4_beamwidth5_totaltime3600_simtime90_searchtype_kinematic_scoretype_learned"
Finally we need to process them:
maindir="/home/autosoftlab/Desktop/RobotTestGeneration/TestGeneration/FinalResults/anafi_learned_run_flown/"
python3 processResults.py --main_directory ${maindir} --searchtype "kinematic" --scoretype "learned" --fileprefix "learned_anafi_sim" --trajectorylength "10" --searchtime "3600" --dronetype "ANAFI"
Plot the deviation
python3 RQ3_Comparison.py
python3 RQ_ANAFI.py